
This is the manual to hUGETracker. I wrote this program because there wasn’t a music editing tool for the Game Boy which fulfilled the following requirements:
- Has a tracker interface
- Produces small output
- Is usable for homebrew titles
- Is open-source
But now there is!
I’d like to acknowledge:
- Eldred “ISSOtm” Habert, who helped me navigate the Game Boy’s peculiarities, and for writing an alternative sound driver for the tracker;
- Tony “Toxa” Pavlov, who helped work on the sound driver and did super valuable work on integration with GBDK-2020;
- Coffee “Valen” Bat, for a crazy amount of testing, documentation, code, and support for new users;
- Michael “Calindro” Stegmaier for Emulicious, a super-accurate emulator that is invaluable for debugging
- Evelyn “Eevee” Woods, whose article on the Game Boy sound system was valuable in writing the music driver;
- B00daW, for testing and debugging support on Linux;
- Lior “LIJI32” Halphon for SameBoy, a super-accurate emulator which I used for debugging, and copied the LFSR code from;
- Christian Hackbart for creating UGE, which serves as hUGETracker’s emulation core;
- Rusty Wagner for writing the sound code which was adapted for UGE;
- The team who created RGBDS, the assembler used for building ROMs from songs;
- The GBDev community, the GBDK-2020 community, and the GBStudio community.
I hope you enjoy composing in hUGETracker, and if you make any cool songs, I’d love to hear from you and potentially include them as demo tunes that come with the tracker.
Join the hUGETracker discord and get in touch!
—Nick “SuperDisk” Faro
Contact us
Glossary
| Term | Definition |
|---|---|
| Cell | A note, an instrument, and an effect. This is a single row in a pattern. |
| Channel | One of the Game Boy’s 4 voices for producing sound. There are 2 pulse channels, one wave channel, and one noise channel. |
| Duty | The parameter that determines the waveform of a pulse channel. A pulse channel has two states (on or off), and the duty cycle specifies what percentage of the time it’s on. A pulse channel with 50% duty would emit a square wave. |
| Effect | Consists of an effect code and effect parameter. Used for a variety of reasons, including changing the way a specific note sounds, changing global settings such as master volume, affecting song tempo, or calling your own custom code. |
| Effect code | A hexadecimal digit which specifies which effect to use. |
| Effect parameter | Two hexadecimal digits which tweak the effect’s behavior. |
| Instrument | A bunch of parameters which change the way a channel produces sound. Each cell must include an instrument number. |
| Octave offset | When entering note values into the tracker grid, the value of the note is increased by , to allow for more natural entry of higher notes. |
| Order | A row of four pattern indices. An order is how you arrange patterns into a structured song. |
| Order table | A list of orders, representing the structure of the song. |
| Pattern | A list of 64 cells, used to represent 2 measures of music. This is the basic building block of your song. |
| Render | Exporting a song as a .wav or .mp3 file, so anybody can listen to them without hUGETracker or an emulator installed. |
| Routine | A custom effect written in Game Boy assembly. An advanced featuer that would typically be used when integrating hUGETracker into a homebrew game, or perhaps for making custom effects. |
| Song | The whole track, which includes patterns, orders, instruments, waves, and routines. |
| Sweep | A change of pitch over time. The Game Boy sound hardware provides the ability for the first pulse channel to perform a sweep as specified by some instrument parameters. |
| Tick | Every time the sound driver update function is called, it advances the song by one tick. This is usually done at around 60 Hz. |
| Tempo | The tempo of a song specifies how many ticks have to elapse before switching to the next row. The greater it is, the slower the song is. |
| Wave | A waveform which changes the timbre of the wave channel when selected. You can draw these in the wave tab. They must be associated to an instrument in the instruments tab. |
Interface
The hUGETracker interface is styled similarly to conventional trackers such as ModPlug Tracker / OpenMPT or ProTracker. If you’re comfortable composing in a tracker interface, then you’ll feel right at home.
Legend:
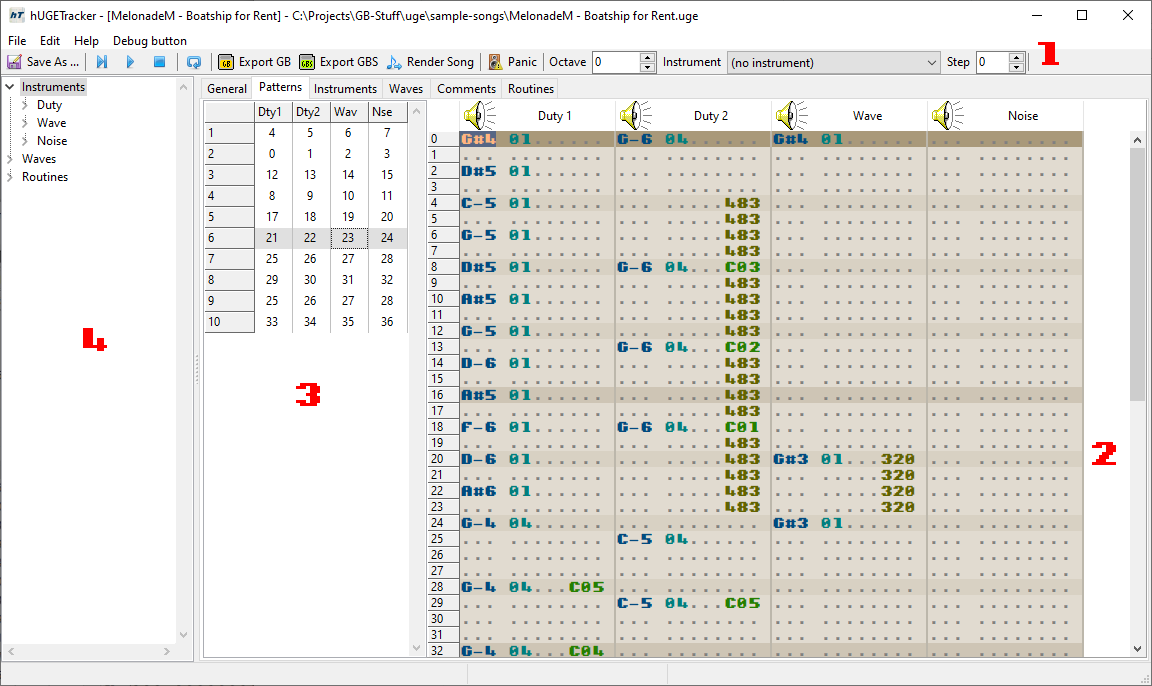
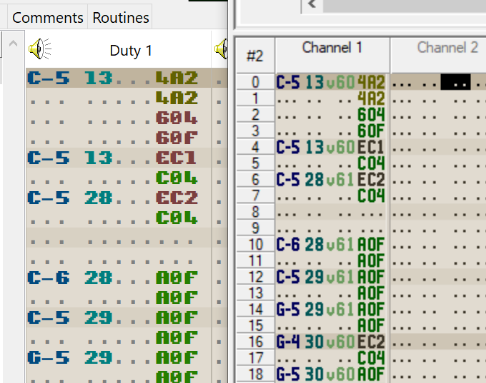
Tracker grid
![]()
The tracker grid displays four patterns together. This represents one row in the order table, and is the component used to compose a song. When a different order is selected in the order table, the patterns in the tracker grid are updated to reflect their contents.
In a given pattern, there are 64 rows of cells. Each cell is divided into three parts: the note, the instrument, and the effect.
A note ranges from C-3 to B-8, and is the pitch of the tone that will play on that cell.
An instrument is a value from 01 to 15, which specifies which instrument parameters will be applied to the playing note.
An effect is the combination of an effect code (the first hexadecimal digit, from 0 to F) and its effect parameter (the last two hexadecimal digits, from 00 to FF).
See the effect reference for more details.
You can use the Effect Editor to create the effect values for you, if you’re not comfortable entering hexadecimal directly.
The keyboard is used to enter values into the three parts of a cell: the keys Q through \, A through `, and Z through / each represent an octave with which to enter notes. The octave offset can be modified in the toolbar to allow for higher or lower note values.
The numeric keys can enter values into the instrument column.
The numeric keys, as well as keys A through F, enter values into the effect column.
While a song is playing, the highlighted row, representing the row currently being played, moves downwards on the patterns. The tempo of your song (speed at which the highlighted row moves) can be adjusted in the General tab.
The headers of the channels are clickable, and will mute/unmute the playback of a specific channel when playing a song.
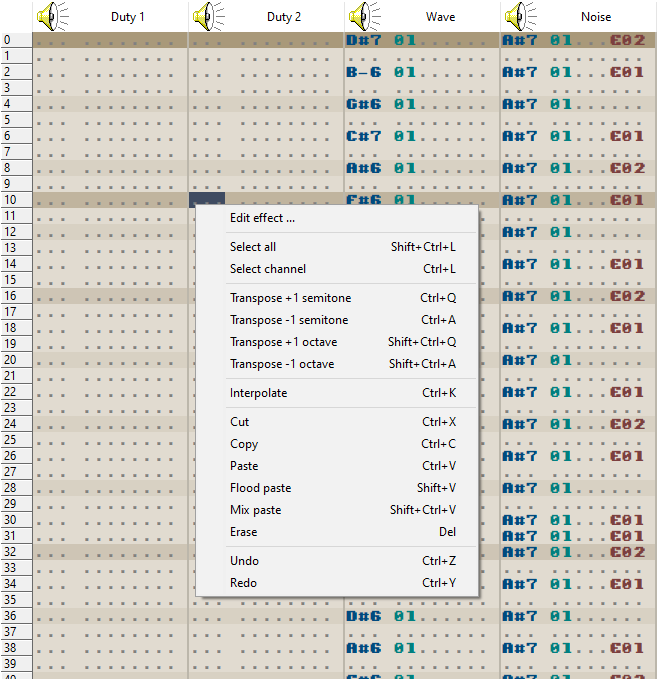
The tracker grid also features a right-click menu for opening the effect editor, and performing various editing tasks. These can all be accomplished by using the hotkeys as well.
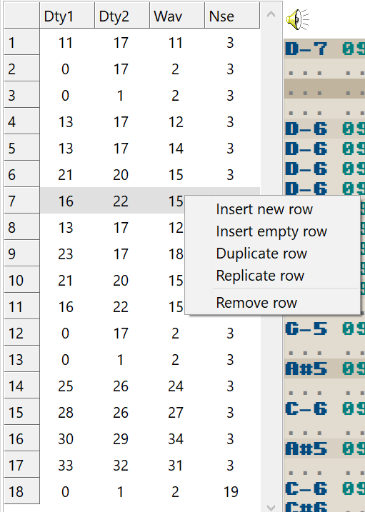
Order editor
The order editor is where you arrange the structure of your song. Since most music tends to be fairly repetitive (a single drum pattern is often enough for the majority of the song, for instance), you can define any number of patterns and arrange them here.
Each column corresponds to a channel in the tracker grid.
Much like the tracker grid, the order editor’s highlighted row moves downward each time a new order is reached. The song loops back to the first order when the last order is finished playing.
An order is a row in this table.
Right-click to open the popup menu, where you can:
- Insert new row — Inserts a row with all brand-new pattern numbers.
- Insert empty row — Inserts a row with all zeros in it.
- Duplicate row — Inserts a row which has the same pattern numbers as the one currently highlighted.
- Replicate row — Inserts a row with all brand-new pattern numbers, and these new patterns are copies of the highlighted row’s.
Song components

The components of a hUGETracker song are shown here. Listed are instruments along with their names, waves numbered from 0 to 15, and routines numbered from 0 to 15.
Double-left clicking on any of these will bring you to the tab for editing it.
Toolbar

The toolbar contains various functions that are useful when writing music:
- Save as… — Saves your song to a file.
- Start — Plays your song from the very beginning.
- Cursor — Plays your song starting from the current cursor position. Useful when editing a specific pattern.
- Stop — Halts playback.
- Export .GB — Assembles your song into a standalone
.gbfile, for playback in an emulator or a real Game Boy! - Export .GBS — Assembles your song into a standalone
.gbsfile, for playback in a program such as gbsplay. - Render song — Exports your song in either
.wavor.mp3format. - Panic — Silences all channels immediately. Useful when something has happened, and a tone is playing that you want to make stop.
- Octave — Selects the octave offset for the tracker grid.
- Instrument — Selects the instrument with which to input new notes in the tracker grid. Any new note entered will be accompanied by this instrument number, and a preview note will play with this instrument.
- Step — Selects the step for the tracker grid. After inputting a new note, the cursor will move down by this many rows; useful for inputting drum tracks or arpeggios.
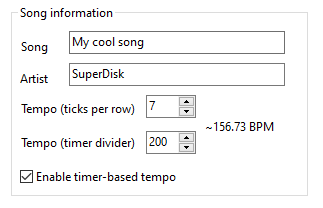
General
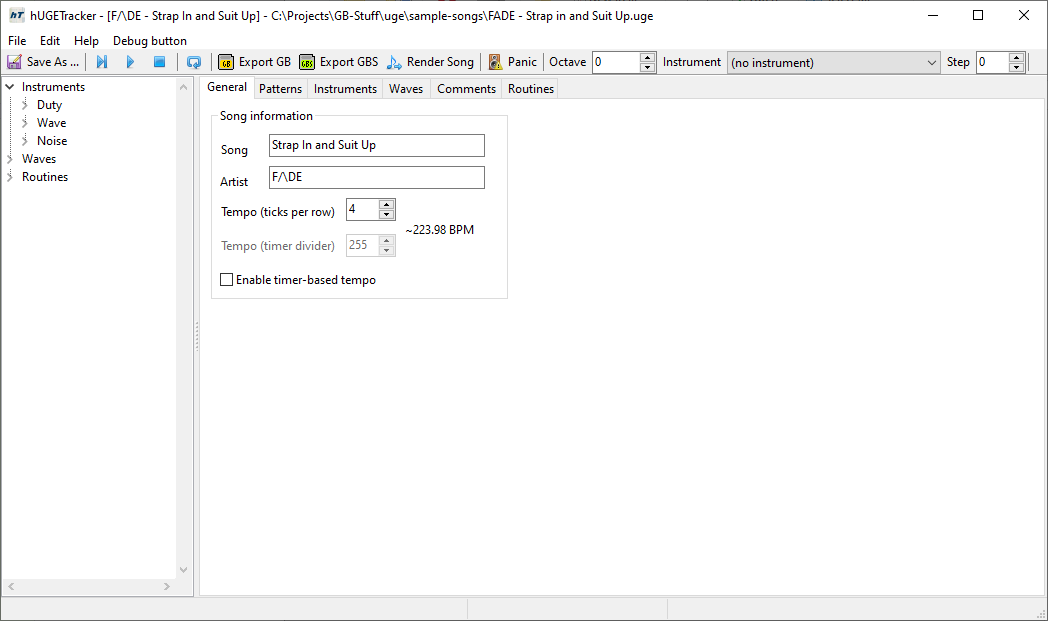
The general tab allows specifying the name, artist, and tempo of your song. Name and artist are limited to 255 characters each. Tempo is limited to a value between 0 and 20.
The tempo actually has an inverse relationship to the speed of the song: a higher value results in a slower song.
Instruments
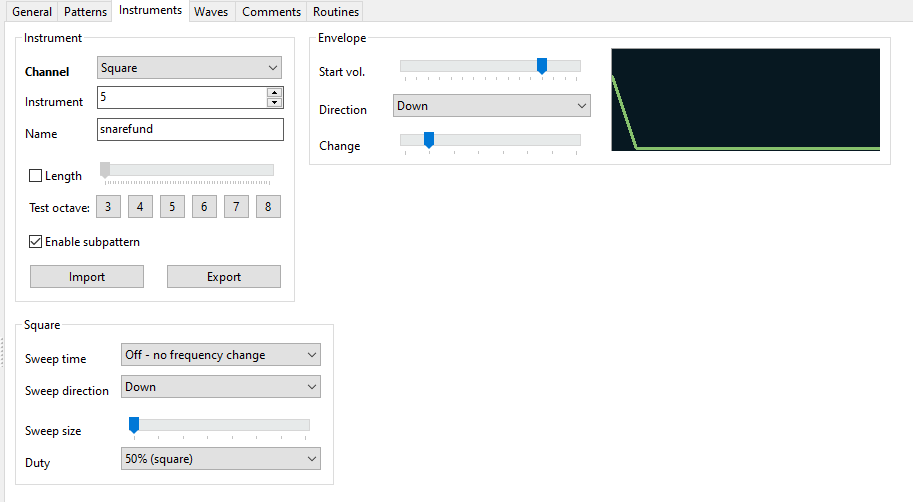
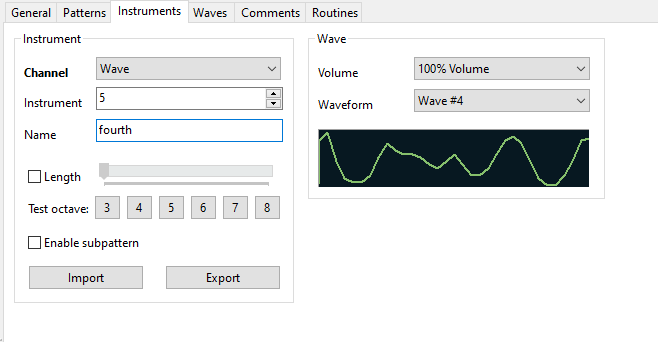
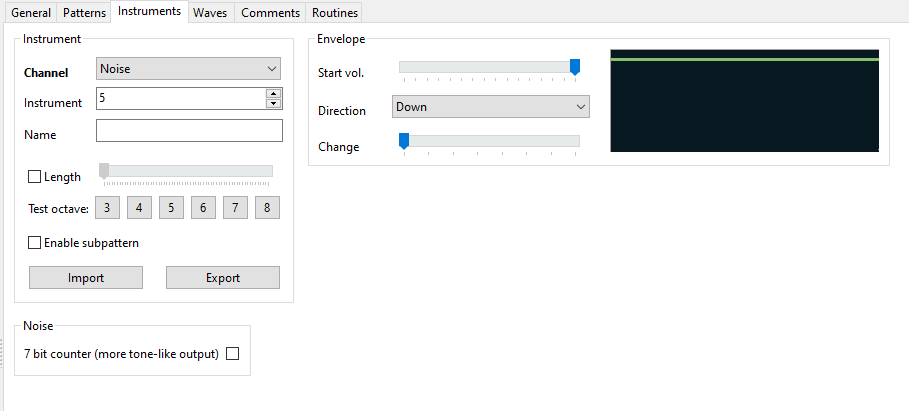
- Channel: Selects which “type” of instrument this is. Can be square, for instruments to be played on the pulse channels; wave, for instruments to be played on the wave channel; and noise, for instruments to be played on the noise channel.
- Instrument number: This selects which instrument of its type to edit. Ranges from 1 to 15 (inclusive).
- Instrument name: This is the name for the instrument. It is shows in the instrument combobox in the toolbar and in the song components.
- Length: When enabled, a playing note will be cut off immediately after a certain amount of time elapses.
- Test octave: Plays a test note for a few seconds, to test what the instrument will sound like.
- Enable subpattern: Use the subpattern when playing the instrument.
- Import/Export buttons: Used to import or export an instrument’s settings to/from a file.
- Sweep time: Selects the “sweep time” for the note to take. The greater the value, the slower the sweep.
- Sweep direction: Selects the direction of the sweep the note should take. “Up” portamentos the note up, “Down” portamentos it down.
- Sweep size: Selects the magnitude of sweep for the note to take per “tick” as specified by sweep time.
- Duty: Selects the timbre of note to play. Each setting sounds different, and they are useful when you don’t want both of the duty channels to clash with one another.
- Start vol: Selects the starting volume for the envelope. When there’s no change on the envelope, this functions simple as the volume for the note, unless overridden by a volume effect command.
- Direction: This specifies which direction for the envelope to go.
- Change: This specifies for how long the envelope goes. The higher the value, the more the note will fade in or out.
- Wave volume: Specifies at what volume a wave instrument shall play, unless overridden by a volume effect command.
- Waveform: Specifies which waveform should play as part of this instrument. See waves.
- 7-bit counter: When checked, the instrument will sound more like a musical tone rather than noise.
Waves
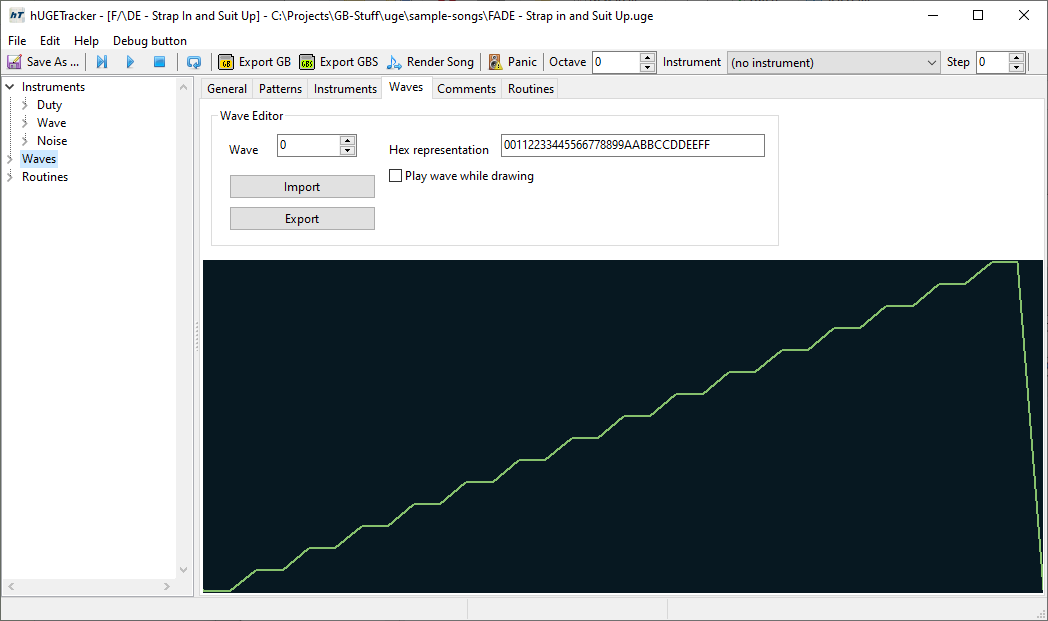
The waves tab allows you to edit waveforms for use by instruments. Use the spinner to select which wave you want to edit, and draw manually with the mouse in the displayed waveform viewer. Waves can also be imported from and exported to files.
Comments
The comments tab allows you to include a comment section with your song, which you can use for acknowledgements, contact information, or anything you want. The comment is limited to 255 characters.
Effect editor
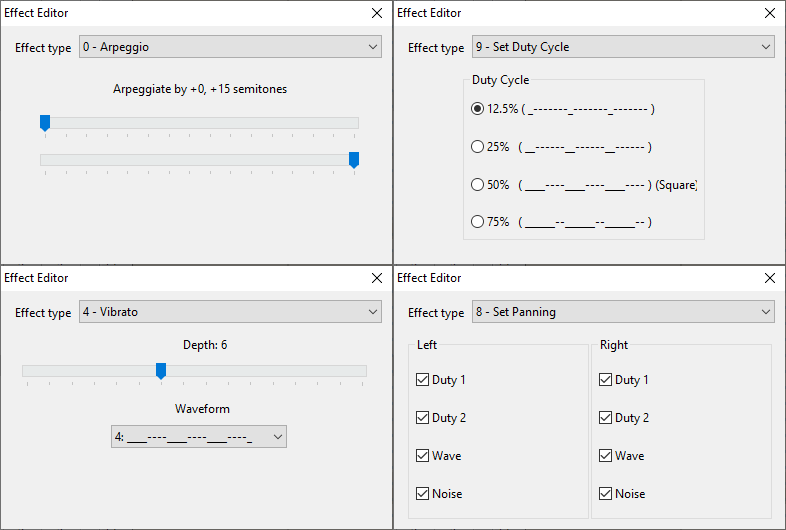
The effect editor is a tool for creating effect values in the tracker grid. This is especially useful for things like panning, or master volume, which operate on a bit level and may be difficult to input manually. Open the editor by double-left clicking in the tracker grid, or with the right click menu.
Effect reference
The hUGETracker effect codes are intentionally similar to ProTracker and FastTracker’s. If you know those, then many of these effects will look familiar to you.
Some things to keep in mind:
-
Effects are only active on the row that they are on; if you want an effect to remain active for several rows, you must re-enter it on each one.
-
Some effects mention “the playing note”, which is the last note played on the channel thus far (possibly in the same row). For example:
Note Instr Effect C-5 1 … … . 047 …the
047arpeggio will apply with theC-5note as its base.
Without further ado, here is the list of effects supported by hUGETracker:
| Effect | Name | Description |
|---|---|---|
0xy | Arpeggio | While this effect is active, the player will cycle on each tick between the playing note, the note + x semitones, and the note + y semitones, in this order. Can be used to create “chords” or a strum effect. |
1xx | Portamento up | Slide the pitch up by xx units every tick. If the row contains a note, then the effect is skipped on the row’s first tick; if the tempo is 1, this means the effect will not do anything at all. |
2xx | Portamento down | Same, but the pitch is slid down instead of up. |
3xx | Tone portamento | Instead of playing the cell’s note, slide the pitch towards that note by xx units every tick. Stops exactly at the note, though. |
4xy | Vibrato | Every x + 1 ticks, switch between the playing note and note + y units. This is similar to arpeggio, except you can control the frequency, and the offset is specified in units rather than semitones. |
5xx | Set master volume | Set the master volume control of the Game Boy for the left and right speakers. Consider using the effect editor. Note that a volume of 0 is not completely silent! |
6xy | Call routine | Call the user-defined routine number y. |
7xx | Note delay | Wait xx ticks before playing the note in this cell. If xx is strictly greater than the tempo, the note will not play at all! |
8xx | Set panning | Set which channels play on which speakers. Consider using the effect editor. Setting a channel to neither left nor right will mute it, but is not recommended1. |
9xx | Change timbre | For pulse channels (CH1 & 2), this changes the duty cycle2; for the wave channel (CH3), this loads wave xx3; for the noise channel (CH4), this changes the LFSR’s width (caution! 4). |
Axy | Volume slide | Slide the note’s volume5 up by x units, or down by y units (either x or y must be 0). The active note will be retriggered on each tick, which may sound bad if envelope and/or length are present. It is recommended to use instead either instrument envelopes, or the C effect, if possible. This effect is not available on the wave channel (CH3)! |
Bxx | Position jump | Jump to order xx. |
Cxy | Set volume | Set the volume of the channel to y, and retrigger the active note. If x is not 0, x will be written to the envelope bits. (To stop the envelope instead, effect A can be used; see below.) |
Dxx | Pattern break | Jump to the next order, and start on row xx. |
Exx | Note cut | Cut the note short after xx ticks; the note won’t be cut if xx is not strictly less than the tempo! |
Fxx | Set tempo | Set the number of ticks per row to xx. Can be used in an alternating fashion to create a swing beat. |
Muting a channel via NR51 may cause an audio pop, and also tends not to play nice with sound effect engines that don’t override NR51. Further, since NR51 is a global effect, it’s still applied even if the channel is “muted”.
xx is written directly to the channel’s length register; if the active instrument has “length” enabled, the length will be reloaded immediately.
Due to hardware limitations, changing the wave requires restarting the active note.
Switching the LFSR from “long mode” to “short mode” at a certain time “locks up” the noise channel, silencing it until it’s retriggered. This should happen consistently for an affected song, and may not appear in the tracker.
Due to hardware limitations, A bases itself off of the instrument’s initial volume, and doesn’t take its envelope, if any, into account.
Tips and tricks
Astops the current instrument’s envelope if one is active.A00is probably not desirable (see footnote above5), so consider using it in a subpattern, so that it is only active for a single tick.- Using
Ccauses a click, so prefer baking the volume into the instrument when possible. - Vibrato using repeated
2xxand1xxeffects can give better results and more intricate/detailed vibrato than4xy, especially in subpatterns. - Alternated
Fxxeffects can help with reaching decimal speeds. For example, alternating betweenF04andF03yields a speed of 3.5; cycling throughF01,F01,F02andF01yields a speed of 1.25; and so on. - Notes without an instrument on their row can help with reducing noise, as the note isn’t retriggered. Of course, this only works if you weren’t planning to change the instrument.
Hotkeys
The keyboard interface to hUGETracker is intentionally designed to be similar to ModPlug’s. If you are used to it, then most of these keybindings will look familiar.
| Hotkey | Action | Description |
|---|---|---|
| Ctrl+C | Copy | Copies the selected pattern data into the clipboard. |
| Ctrl+X | Cut | Copies the selected pattern data into the clipboard, then erases the selected pattern data. |
| Ctrl+V | Paste | Pastes any pattern data stored in the clipboard. |
| Shift+V | Flood paste | Repeatedly pastes stored pattern data until reaching the bottom of the pattern. Useful for repeating beats/phrases/swing tempos. |
| Ctrl+Q | Semitone up | Transposes the selected notes one semitone up. |
| Ctrl+A | Semitone down | Transposes the selected notes one semitone down. |
| Ctrl+Shift+Q | Octave up | Transposes the selected notes one octave up. |
| Ctrl+Shift+A | Octave down | Transposes the selected notes one octave down. |
| Ctrl+L | Select channel | Selects the entire pattern that the cursor is located in. |
| Delete | Erase | Erases the selected note data. |
| Ctrl+Z | Undo | Undoes the previous action. |
| Ctrl+Y | Redo | Redoes that action last undone. |
Subpatterns
Subpatterns are one of hUGETracker’s most powerful features. They are like mini-tracker grids attached to instruments, which allow you to use effects on very precise ticks. They fulfill the same role as instrument macros in FamiTracker.
What are subpatterns useful for?
- Percussion! (Subpatterns replace noise macros)
- Cooler arpeggios than effect
0! - Nicer vibratos than effect
4! - “Pluck” sounds! (Start one octave up, then go back to base)
- Serves as an extra FX channel in a pinch!
- Changing timbre really quickly! (Use effect
9) - And much more!
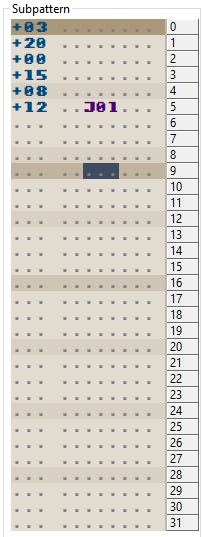
Rows are composed of three columns, similiar but not identical to the tracker grid’s:
- an offset,
- an optional jump to a specific row,
- and an effect.
The offset is a positive number of semitones that is applied to the base note.
Subpatterns automatically loop back to the beginning, or can be made to jump backwards earlier via the jump column. If you want to halt a subpattern in place and have it not loop at all, specify a jump command that jumps to itself.
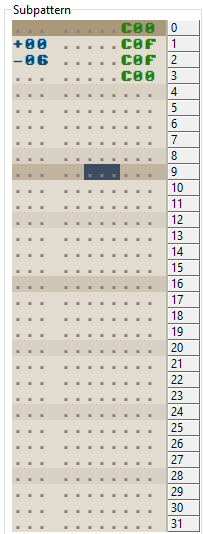
Interaction with the “regular” tracker grid
Subpatterns take precedence over the “regular” tracker grid. That is, if there’s a row on the tracker grid like so:
C-5 05 101
And the first row of instrument 05’s subpattern is:
+02 ... ...
Then the +02 offset in the subpattern will override the 1xx portamento up effect.
Effects
Effects in subpatterns work just like in the regular tracker grid (reference), except for two things:
- each effect only lasts for a single tick (just like the rows);
- not all effects can be used in subpatterns:
| Effect | Name | Usable? | Notes |
|---|---|---|---|
0xy | Arpeggio | Yes | Technically you can use this, but 1) you would have to use it on many rows consecutively, and 2) you can just use the offset column instead. |
1xx | Portamento up | Yes | The “units” are finer than semitones, so this can be used to increase granularity |
2xx | Portamento down | Yes | Same as above. |
3xx | Tone portamento | No | There is no “target note” in the first place. |
4xy | Vibrato | Yes | This can give finer control than the offset column, but you will have to use this effect on many consecutive rows, and the portamento effects may work better in the first place. |
5xx | Set master volume | Yes | |
6xy | Call routine | Yes | |
7xx | Note delay | No | There is no note in the first place. |
8xx | Set panning | Yes | |
9xx | Change timbre | Yes | |
Axy | Volume slide | Yes | C may be more appropriate, since this will only be active for a single tick. |
Bxx | Position jump | No | Use the jump column instead. |
Cxy | Set volume | Yes | |
Dxx | Pattern break | No | Use the jump column instead. |
Exx | Note cut | No | Use C00 instead. |
Fxx | Set tempo | Yes | …but why would you do this? |
Routines
Routines allow you to implement your own effects.
The feature is currently not documented here, and is subject to change soon.
If you’re really interested, check out the hUGEDriver/driverLite.z80 file.
hUGETracker .UGE v5/v6 format spec
Data types
| Name | Byte length | Description |
|---|---|---|
uint8 | 1 | Also known as char, ranges from 0 to 255. |
uint32 | 4 | Also known as word, ranges from 0 to 4,294,967,295. |
int8 | 1 | Ranges from -127 to 127. |
bool | 1 | If not-zero, then True. |
shortstring | 256 | Consists of a byte defining the readable length and then 255 characters. |
string | - | Consists of a uint32 defining the number of characters, and then a stream of characters, with 0x00 being the terminator value. |
All types are little endian unless noted otherwise.
Header
uint32Version numbershortstringSong nameshortstringSong artistshortstringSong comment
Duty Instruments
- Repeat 15 times:
uint32Type (0)shortstringInstrument nameuint32LengthboolLength enableduint8Initial volumeuint32Volume sweep direction (0 = Increase, 1 = Decrease)uint8Volume sweep changeuint32Frequency sweep timeuint32Sweep enabled (1 = Enabled, 0 = Disabled)uint32Frequency sweep shiftuint8Duty cycleuint32Unuseduint32Unused- If
Version number< 6:uint32Unused
uint32Unused- If
Version number< 6:uint32Unused
- Else:
boolSubpattern enabled- Repeat 64 times:
uint32Row note (0 through 72, 90 if not used)uint32Unuseduint32Jump command value (0 if empty)uint32Effect codeuint8Effect parameter
- Repeat 64 times:
- If
Version number>= 4 andVersion number< 6:- Repeat 6 times:
int8unused
- Repeat 6 times:
Wave Instruments
- Repeat 15 times:
uint32Type (1)shortstringInstrument nameuint32LengthboolLength enableduint8Unuseduint32Unuseduint8Unuseduint32Unuseduint32Unuseduint32Unuseduint8Unuseduint32Volumeuint32Wave index- If
Version number< 6:uint32Unused
uint32Unused- If
Version number< 6:uint32Unused
- Else:
boolSubpattern enabled- Repeat 64 times:
uint32Row note (0 through 72, 90 if not used)uint32Unuseduint32Jump command value (0 if empty)uint32Effect codeuint8Effect parameter
- Repeat 64 times:
- If
Version number>= 4 andVersion number< 6:- Repeat 6 times:
int8Unused
- Repeat 6 times:
Noise Instruments
- Repeat 15 times:
uint32Type (2)shortstringInstrument nameuint32LengthboolLength enableduint8Initial volumeuint32Volume sweep direction (0 = Increase, 1 = Decrease)uint8Volume sweep changeuint32Unuseduint32Unuseduint32Unuseduint8Unuseduint32Unuseduint32Unused- If
Version number< 6:uint32Unused
uint32Noise mode (0 = 15 bit, 1 = 7 bit)- If
Version number< 6:uint32Unused
- Else:
boolSubpattern enabled- Repeat 64 times:
uint32Row note (0 through 72, 90 if not used)uint32Unuseduint32Jump command value (0 if empty)uint32Effect codeuint8Effect parameter
- Repeat 64 times:
- If
Version number>= 4 andVersion number< 6:- Repeat 6 times:
int8Noise macro data
- Repeat 6 times:
Wavetable data
- Repeat 16 times:
- Repeat 32 times:
uint8Wavetable nibble data
- If
Version Number< 3:uint8Off by one filler
- Repeat 32 times:
Song Patterns
uint32Initial ticks per row- If
Version number>= 6:boolTimer based tempo enableduint32Timer based tempo devider
uint32Number of song patterns- Repeat
Number of song patternstimes:uint32Pattern index- Repeat 64 times:
uint32Row note (0 through 72, 90 if not used)uint32Instrument value (0 if not used)- If
Version number>= 6:uint32Unused
uint32Effect codeuint8Effect parameter
Song Orders
- Repeat 4 times (Duty 1, Duty 2, Wave, Noise):
uint32Order length + 1 (Off by one bug)- Repeat
Order lengthtimes:uint32Order index
uint32Off by one bug filler (0)
Routines
- Repeat 16 times:
stringRoutine code data
Miscellaneous
Here are some random things about hUGETracker.
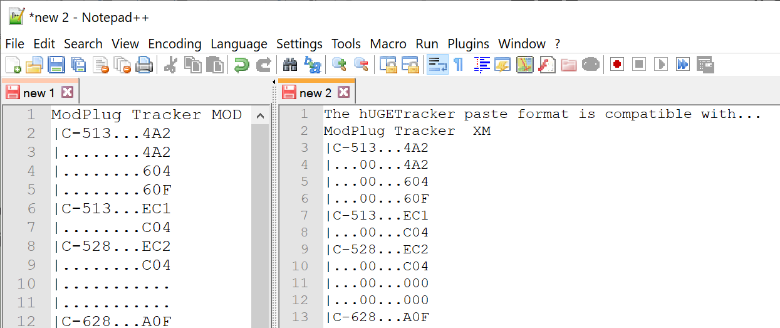
The clipboard
The clipboard format for hUGETracker is compatible with ModPlug Tracker / OpenMPT!
This means that you can convert your existing .mod, .xm, .s3m, or .it chiptunes into Game Boy tunes very quickly by just copying and pasting your patterns into hUGETracker.
Note that the effects are not converted when pasted, so you’ll need to manually adjust the effects to work in hT.
Command Line Options
hUGETracker supports loading a module passed as the first command line argument. Additionally, data directories can be configured using the --conf_dir, --cache_dir and --runtime_dir options. This allows running hUGETracker from a read-only directory, or packaging hUGETracker for Linux distributions.
| Option | Information |
|---|---|
--conf_dir | Where user configuration is stored (settings, keymaps, color schemes). |
--cache_dir | Where intermediate files generated during song assembly are stored. |
--runtime_dir | Where necessary files that normally ship with hUGETracker are stored. This includes hUGEDriver, halt.gb, etc. |
What is hUGEDriver?
hUGEDriver is a driver for hUGETracker. What does that mean?
Well, think about an MP3 file: a program like VLC is required to play those back. Similarly, hUGETracker “only” generates music data, and something has to interpret it to actually produce sound.
This is also why hUGEDriver is also called a “player” for hUGETracker, though this is slightly inexact, because hUGEDriver is not a complete playback solution: it’s meant to integrate with your code, that will decide what music must be played, when, and how. For more information about that, please read the next chapter.
Notes
Make sure to always use compatible versions of hUGETracker and hUGEDriver together!! For example, you cannot use hUGETracker 1.0b10 with hUGEDriver 1.0b9, as the data format is different between those two versions.
hUGEDriver is the reference driver, meaning that it will always be kept up to date. Other implementations (such as fortISSimO) are available, but they are not officially supported.
Under the hood, hUGETracker plays your songs by emulating a Game Boy running hUGEDriver. Doing it this way instead of interpreting the music data directly helps avoiding any discrepancies between playback in the tracker and on the console. If you find any, it’s probably a bug, please tell us!
Integration
Integrating hUGEDriver into your project depends on what you are using.
First, get the release of hUGEDriver that matches your version of hUGETracker.
RGBDS (assembly)
Import hUGEDriver.asm and hUGE.inc (in the include directory) into your project (songs need the latter as well).
You will additionally need hardware.inc 4.2 or later, if you don’t already.
Then, simply compile hUGEDriver.asm with the rest of your code, and you’re done!
GBDK (C)
hUGEDriver releases contain a pre-compiled .lib for use with GBDK-2020. Link it while compiling, include hUGEDriver.h, and you’re done:
lcc ... -Wl-lhUGEDriver.lib
If you want to compile the driver yourself, a few extra steps are necessary.
- You will need RGBDS, and Python
- Assemble hUGEDriver:
rgbasm -o hUGEDriver.obj hUGEDriver.asm - Convert the object file:
python tools\rgb2sdas.py -o hUGEDriver.o hUGEDriver.obj - Import
hUGEDriver.hinto your project - Simply link
hUGEDriver.owith the rest of your code, and you’re done!
Usage
There are two parts to using hUGEDriver: initializing a song, and playing a song.
Initialization
You begin playing a song by passing a pointer to it to the hUGE_init function.
How can you get such a pointer, though?
Simple!
The “song descriptor” that you choose when exporting your song names a label (assembly) / variable (C) that points to the song!
So if your song descriptor was, say, ryukenden:
| Assembly | C |
|---|---|
|
|
Playing
The function hUGE_dosound plays a single tick of the current song when called.
First and foremost, how often should that function be called? That actually depends on what the song expects!
If the song does not use “timer playback”, then hUGE_dosound must be called once per frame.
This is usually done either by calling it from your game’s main loop, or by calling it from your VBlank interrupt handler.
However, if the song does use timer playback, then you must set the timer registers appropriately (TODO), and call hUGE_dosound from the timer interrupt handler.
Using an interrupt handler exposes you to two additional constraints:
hUGE_dosoundmust not run in the middle ofhUGE_init.hUGE_dosoundmust not be called before the first call ever tohUGE_init.
Preferably, create a variable that you set to 0 on boot before calling hUGE_init, and to 1 after hUGE_init returns; in the interrupt handler, skip calling hUGE_dosound if the variable isn’t 0. An alternative is to disable interrupts (ASM: di+ei, GBDK: __critical) while you call hUGE_init.
Sound effects
hUGEDriver itself does not provide sound effects, but is compatible with existing sound effect solutions. Both music and sound effects need to contend for the Game Boy’s four sound channels, so a little cooperation is required.
The general outline of how to play sound effects and music is as follows:
- Tell hUGEDriver to “release” a channel; that is, hUGEDriver refrains from touching it at all, which leaves it free for other code to use (say, an SFX engine, or a sample player).
- Use your SFX engine to play a sound effect on that channel
- After the sound effect is complete, tell hUGEDriver to use the channel again, so music will resume playing on that channel
“Releasing” a channel is also known as “muting.”
How-to
RGBDS (assembly)
Call hUGE_mute_channel with b containing the channel’s ID minus one (so between 0 and 3 inclusive), and c being 0 to release the channel, or 1 to unmute it.
GBDK (C)
Call hUGE_mute_channel; see hUGEDriver.h for the corresponding arguments.
Notes
- IMPORTANT precaution for CH3: if you release this channel and modify wave RAM, you must inform hUGEDriver, by writing
hUGE_NO_WAVEtohUGE_current_wave. This will tell hUGEDriver to reload wave RAM when the channel is un-released; otherwise, you may get the wrong waveform when the music resumes. - “Global” effects (5, 8, B, D, and F) are still processed, even if the channel they are attached to is released.
Importantly, this means hUGEDriver will write to
NR50(5) andNR51(8).
SFX Engines
These projects aren’t part of hUGETracker, but they’re known solutions that work well with it:
- VGM2GBSFX - Can use VGM files as sound effects. Since hUGETracker can export to
.vgm, you can make your sound effects in hUGETracker! - CBT-FX - Sound effect engine compatible with FX Hammer
- Libbet’s SFX Engine - Simple engine for assembly projects